I’ve been burned by paid email hosting more times than I care to admit. You pay $6/month per mailbox, forget to cancel when a side project dies, and suddenly you’re out $72 a year for something that forwarded ten emails.
This guide shows how I run [email protected] for free using Cloudflare Email Routing (inbound) plus Gmail’s SMTP relay (outbound). No Google Workspace. No Zoho upsells. Just your domain, a Cloudflare account, and the Gmail you already have.
What you’ll end up with:
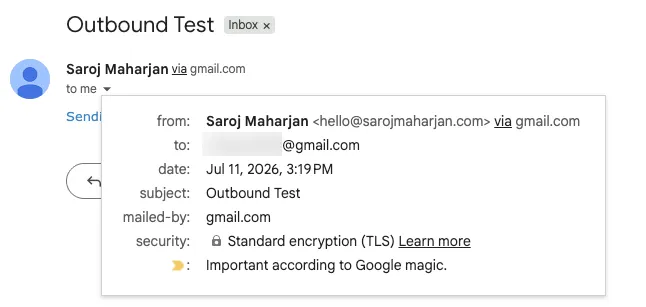
A sample email sent from [email protected] as seen by the recipient.
flowchart TB
    subgraph INBOUND
        Sender["Sender"] --> CF["Cloudflare Email Routing"]
        CF --> GmailInbox["[email protected]"]
    end
flowchart TB
    subgraph OUTBOUND
        GmailOutbox["[email protected]"] --> SMTP["Google SMTP Relay"]
        SMTP --> Recipient["Recipient"]
    end
- Receiving email at
[email protected]→ forwarded to your personal Gmail - Sending email as
[email protected]→ goes out through Google’s SMTP
It’s not perfect (you’ll see the caveats later), but for a portfolio site, a side project, or a small business landing page, it gets the job done for exactly $0/month.
Outline
- Step 1: Buy a domain and point nameservers to Cloudflare
- Step 2: Activate Cloudflare Email Routing
- Step 3: Generate a Google App Password
- Step 4: Link the alias to your Gmail settings
- Step 5: Fix DNS records so your mail doesn’t go to spam
- Bonus I: Catch-all rule
- Bonus II: DMARC policy
- Bonus III: Gravatar profile image
- Testing your setup
- Caveats and limitations
Step 1: Buy a domain and point nameservers to Cloudflare
Nothing fancy here. You need a domain and Cloudflare needs to be the one managing its DNS.
- Buy a domain from any registrar — Namecheap, Porkbun, or Cloudflare Registrar itself. Doesn’t matter which.
- Create a free Cloudflare account at cloudflare.com .
- Add your site — click Add a Site on the dashboard, enter your root domain (e.g.,
yourdomain.com), and pick the Free Plan. - Note the nameservers Cloudflare gives you — two addresses like
tara.ns.cloudflare.comandbrad.ns.cloudflare.com. Yours will be different. - Update your registrar — log back into wherever you bought the domain, find the Custom Nameservers section, and paste Cloudflare’s nameservers in place of the defaults.
- Wait for propagation — click Check Nameservers in the Cloudflare dashboard. Could be 5 minutes. Could be a few hours. Grab a coffee.
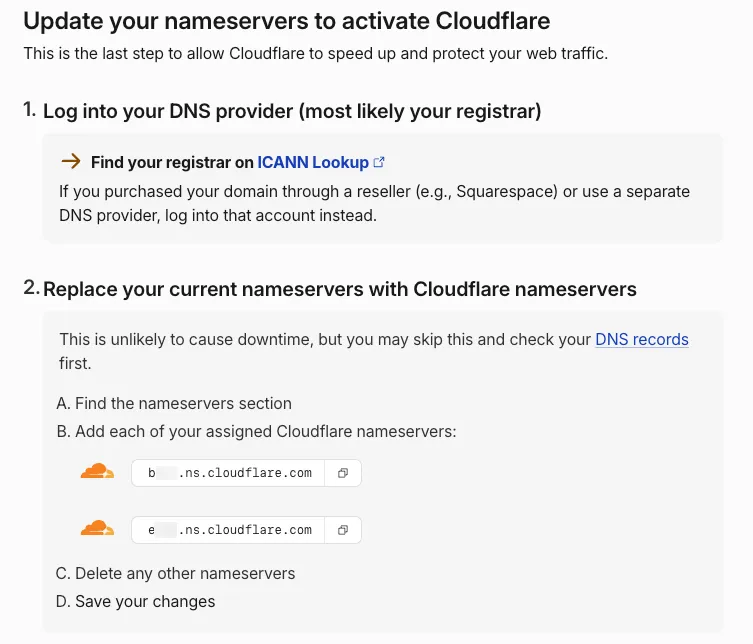
Replace your registrar’s nameservers with the two Cloudflare nameservers provided during setup.
Step 2: Activate Cloudflare Email Routing
Now that Cloudflare owns your DNS, you can tell it to forward incoming email.
- In the Cloudflare left sidebar, go to Email > Email Routing.
- Click Get Started (or Onboard Domain).
- Under Destination addresses, click Add destination address. Enter your personal
@gmail.com. - Check your Gmail inbox — there’ll be an activation email from Cloudflare. Click the link.
- Back in Cloudflare, go to Routing rules and click Create address. Set your alias (e.g.,
hello) and pick your verified Gmail as the target. - When Cloudflare asks, click Add records automatically. This sets up the MX and SPF records in your DNS zone.
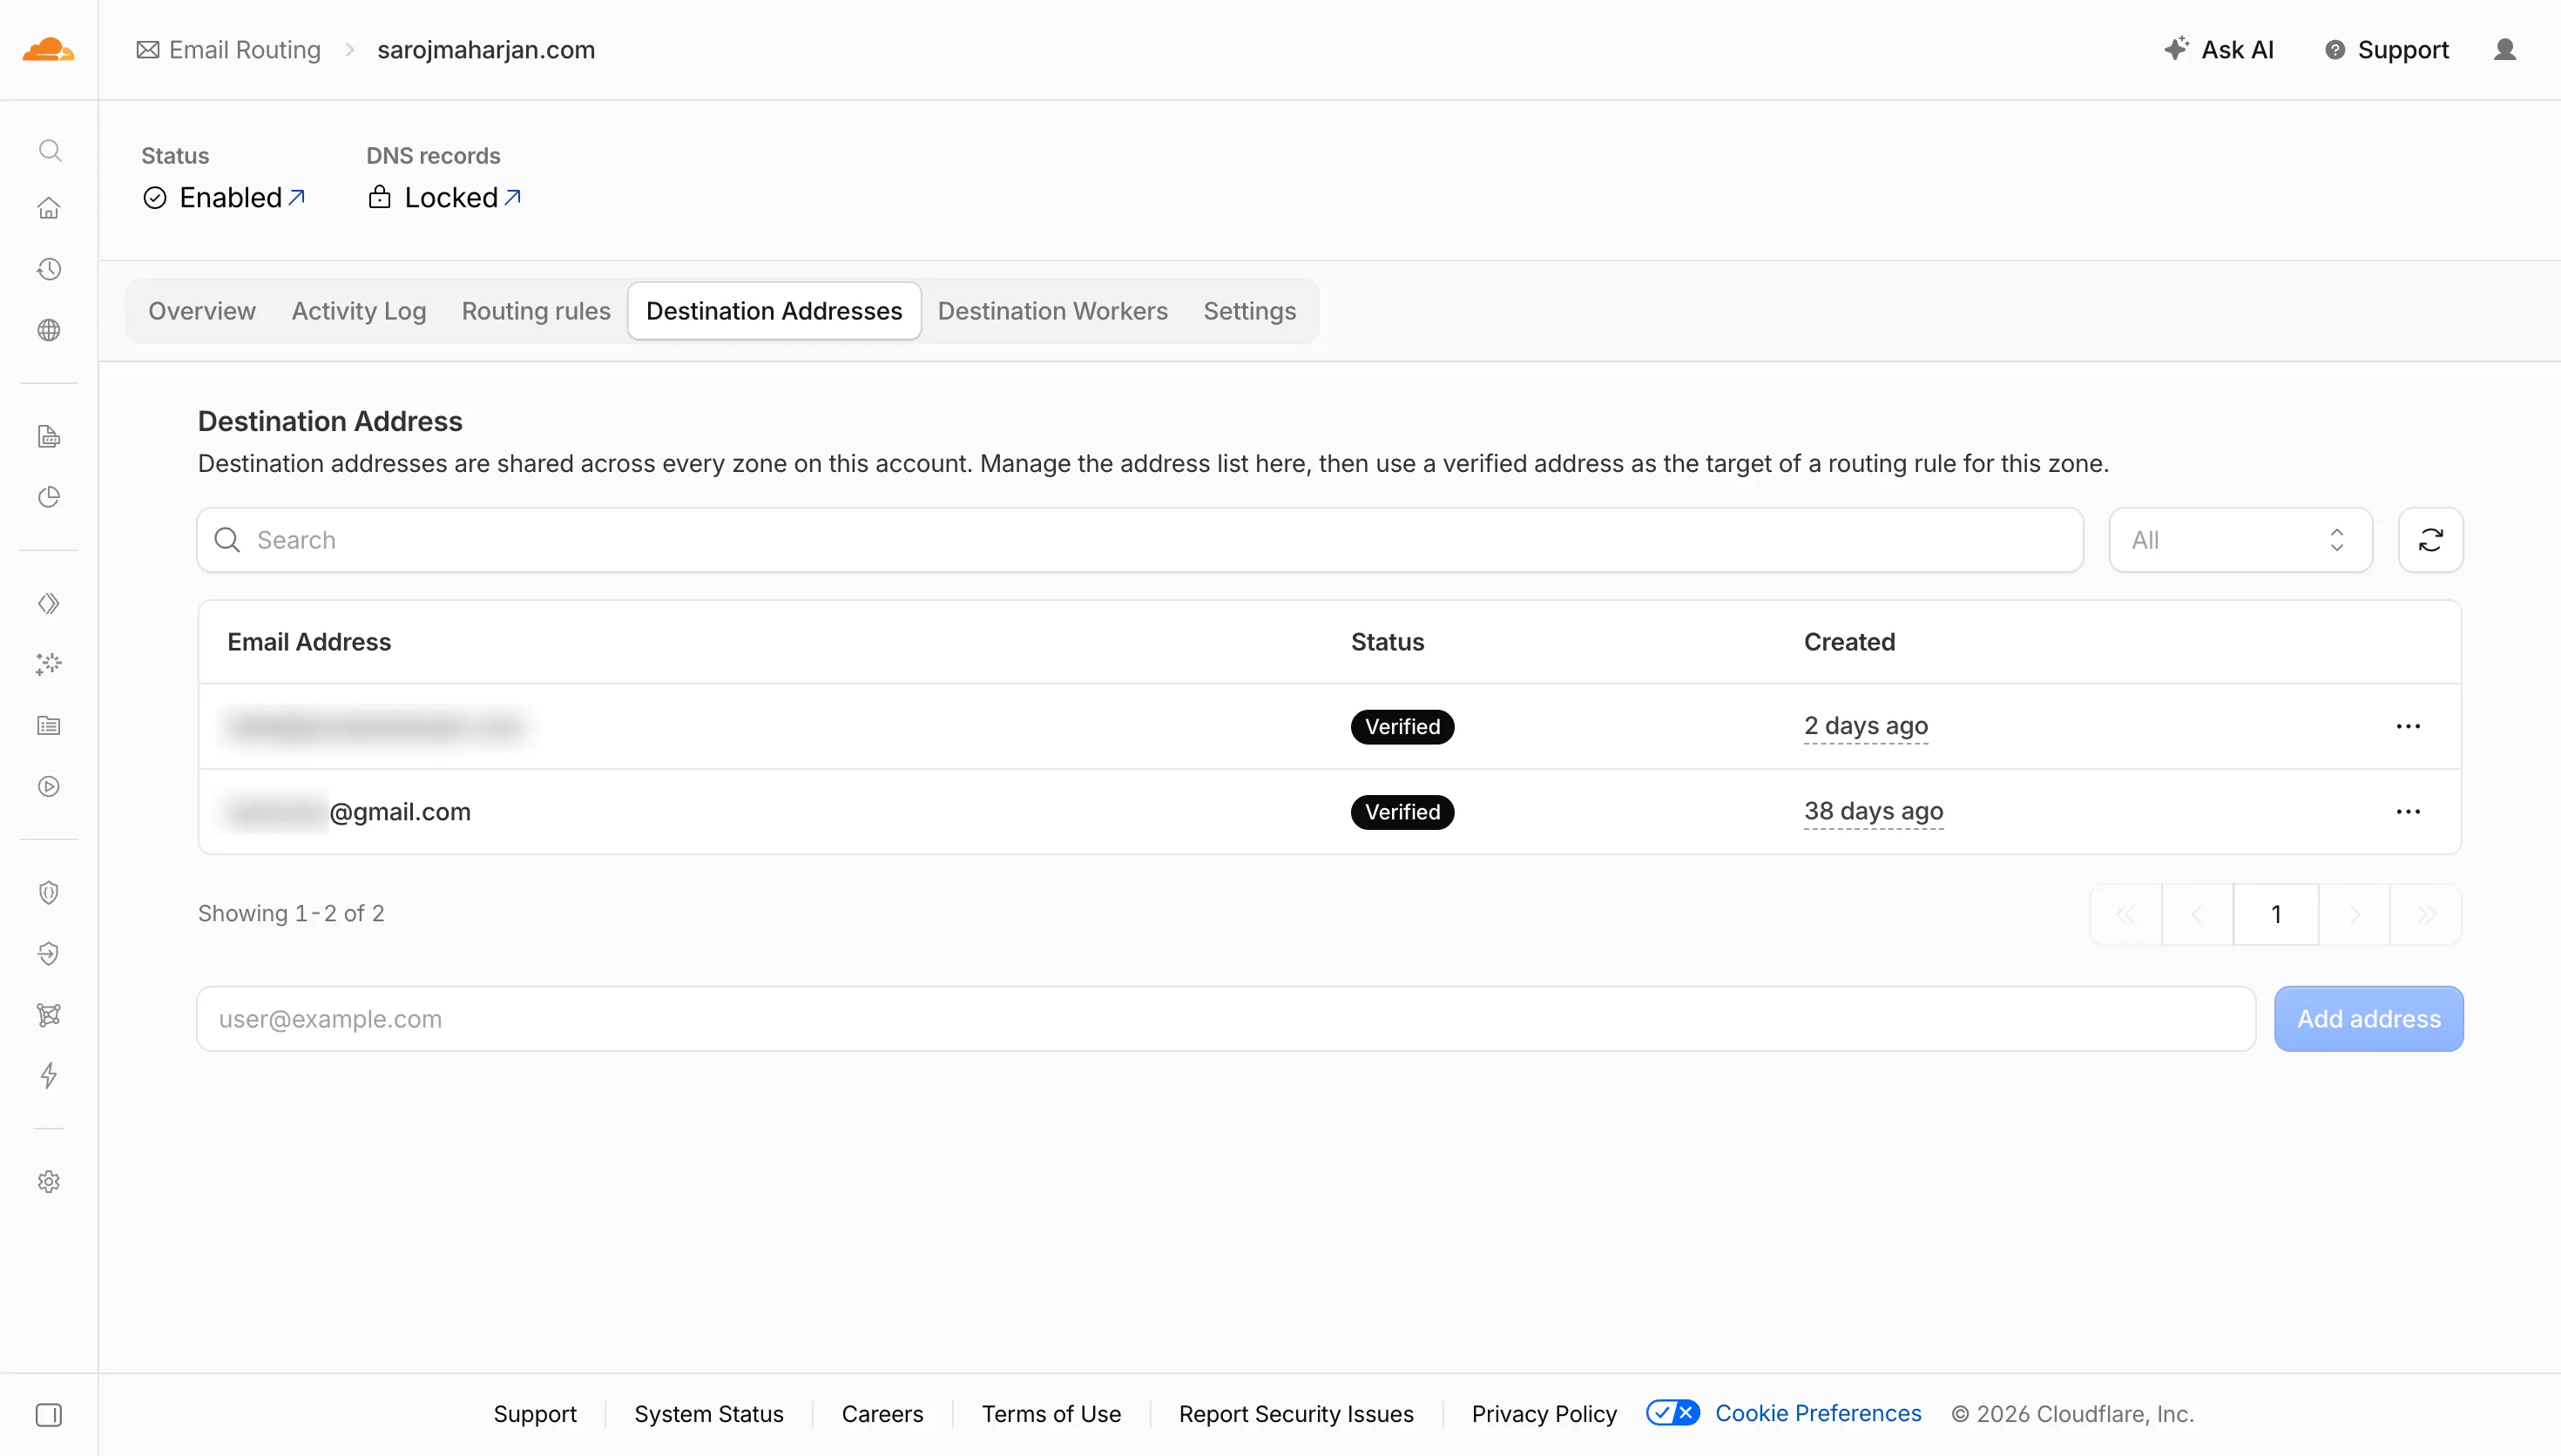
Add your personal Gmail address as a destination in Cloudflare Email Routing.
Step 3: Generate a Google App Password
Google won’t let you use your regular password for SMTP. You need an app-specific token.
- Go to your Google Account and enable 2-Step Verification under Security (you need this for App Passwords to work).
- Navigate to the App Passwords page .
- Enter a label (e.g.,
Cloudflare Mail Outbound) and click Create. - Copy the 16-character password that appears. You’ll need it in the next step.
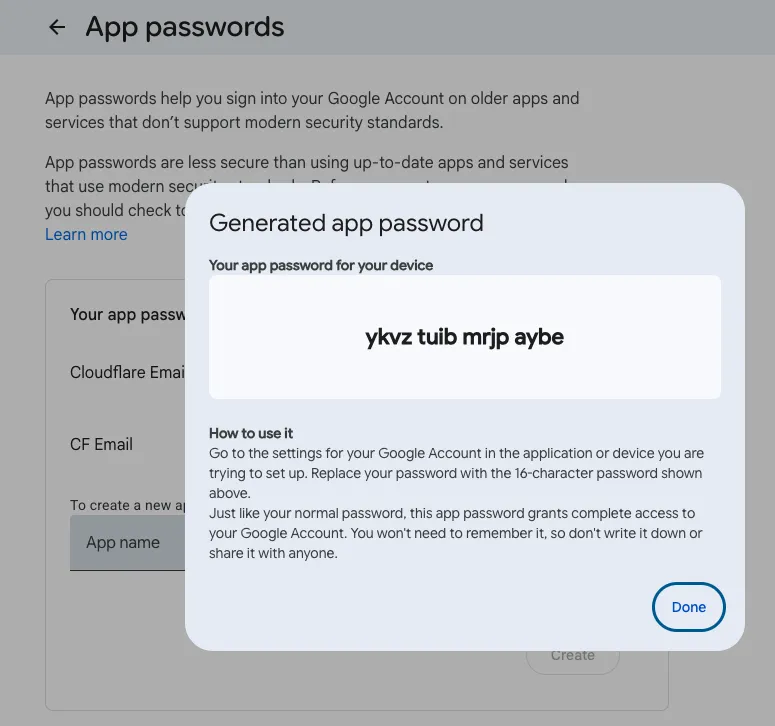
Generate a unique 16-character App Password for Gmail’s SMTP relay.
Step 4: Link the alias to your Gmail settings
Now you tell Gmail: “hey, I want to send mail from this custom address, using Gmail’s own servers.”
- Open Gmail, click the gear icon (top right), then See all settings.
- Go to Accounts and Import.
- Under Send mail as, click Add another email address.
- Enter your name and your custom domain email (
[email protected]). - Uncheck the box that says “Treat as an alias.” Click Next Step.
- Fill in the SMTP settings:
- SMTP Server:
smtp.gmail.com - Port:
587 - Username: your full
@gmail.comaddress - Password: the 16-character App Password from Step 3 (no spaces)
- Security: Secured connection using TLS
- SMTP Server:
- Click Add Account. Google sends a verification code to your custom address.
- Since Cloudflare is forwarding it, the code lands in your Gmail inbox. Copy it, paste it, click Verify.
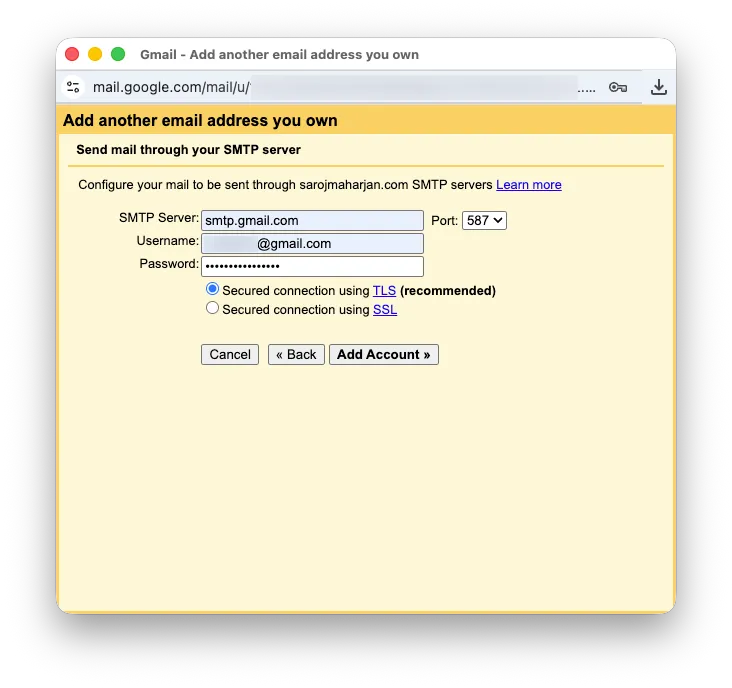
Configure the SMTP settings in Gmail: smtp.gmail.com, port 587, TLS, and your App Password.
Step 5: Fix DNS records so your mail doesn’t go to spam
If you stop at Step 4, your outbound emails will look suspicious to recipient servers. Google is sending them, but the SPF record says only Cloudflare is authorized. You need to add Google to the SPF record.
- In Cloudflare, go to DNS > Records.
- Find the TXT record for your root domain that starts with
v=spf1(Cloudflare added this automatically in Step 2). - Click Edit.
- Modify it to include Google:
v=spf1 include:_spf.mx.cloudflare.net include:_spf.google.com ~all - Click Save.
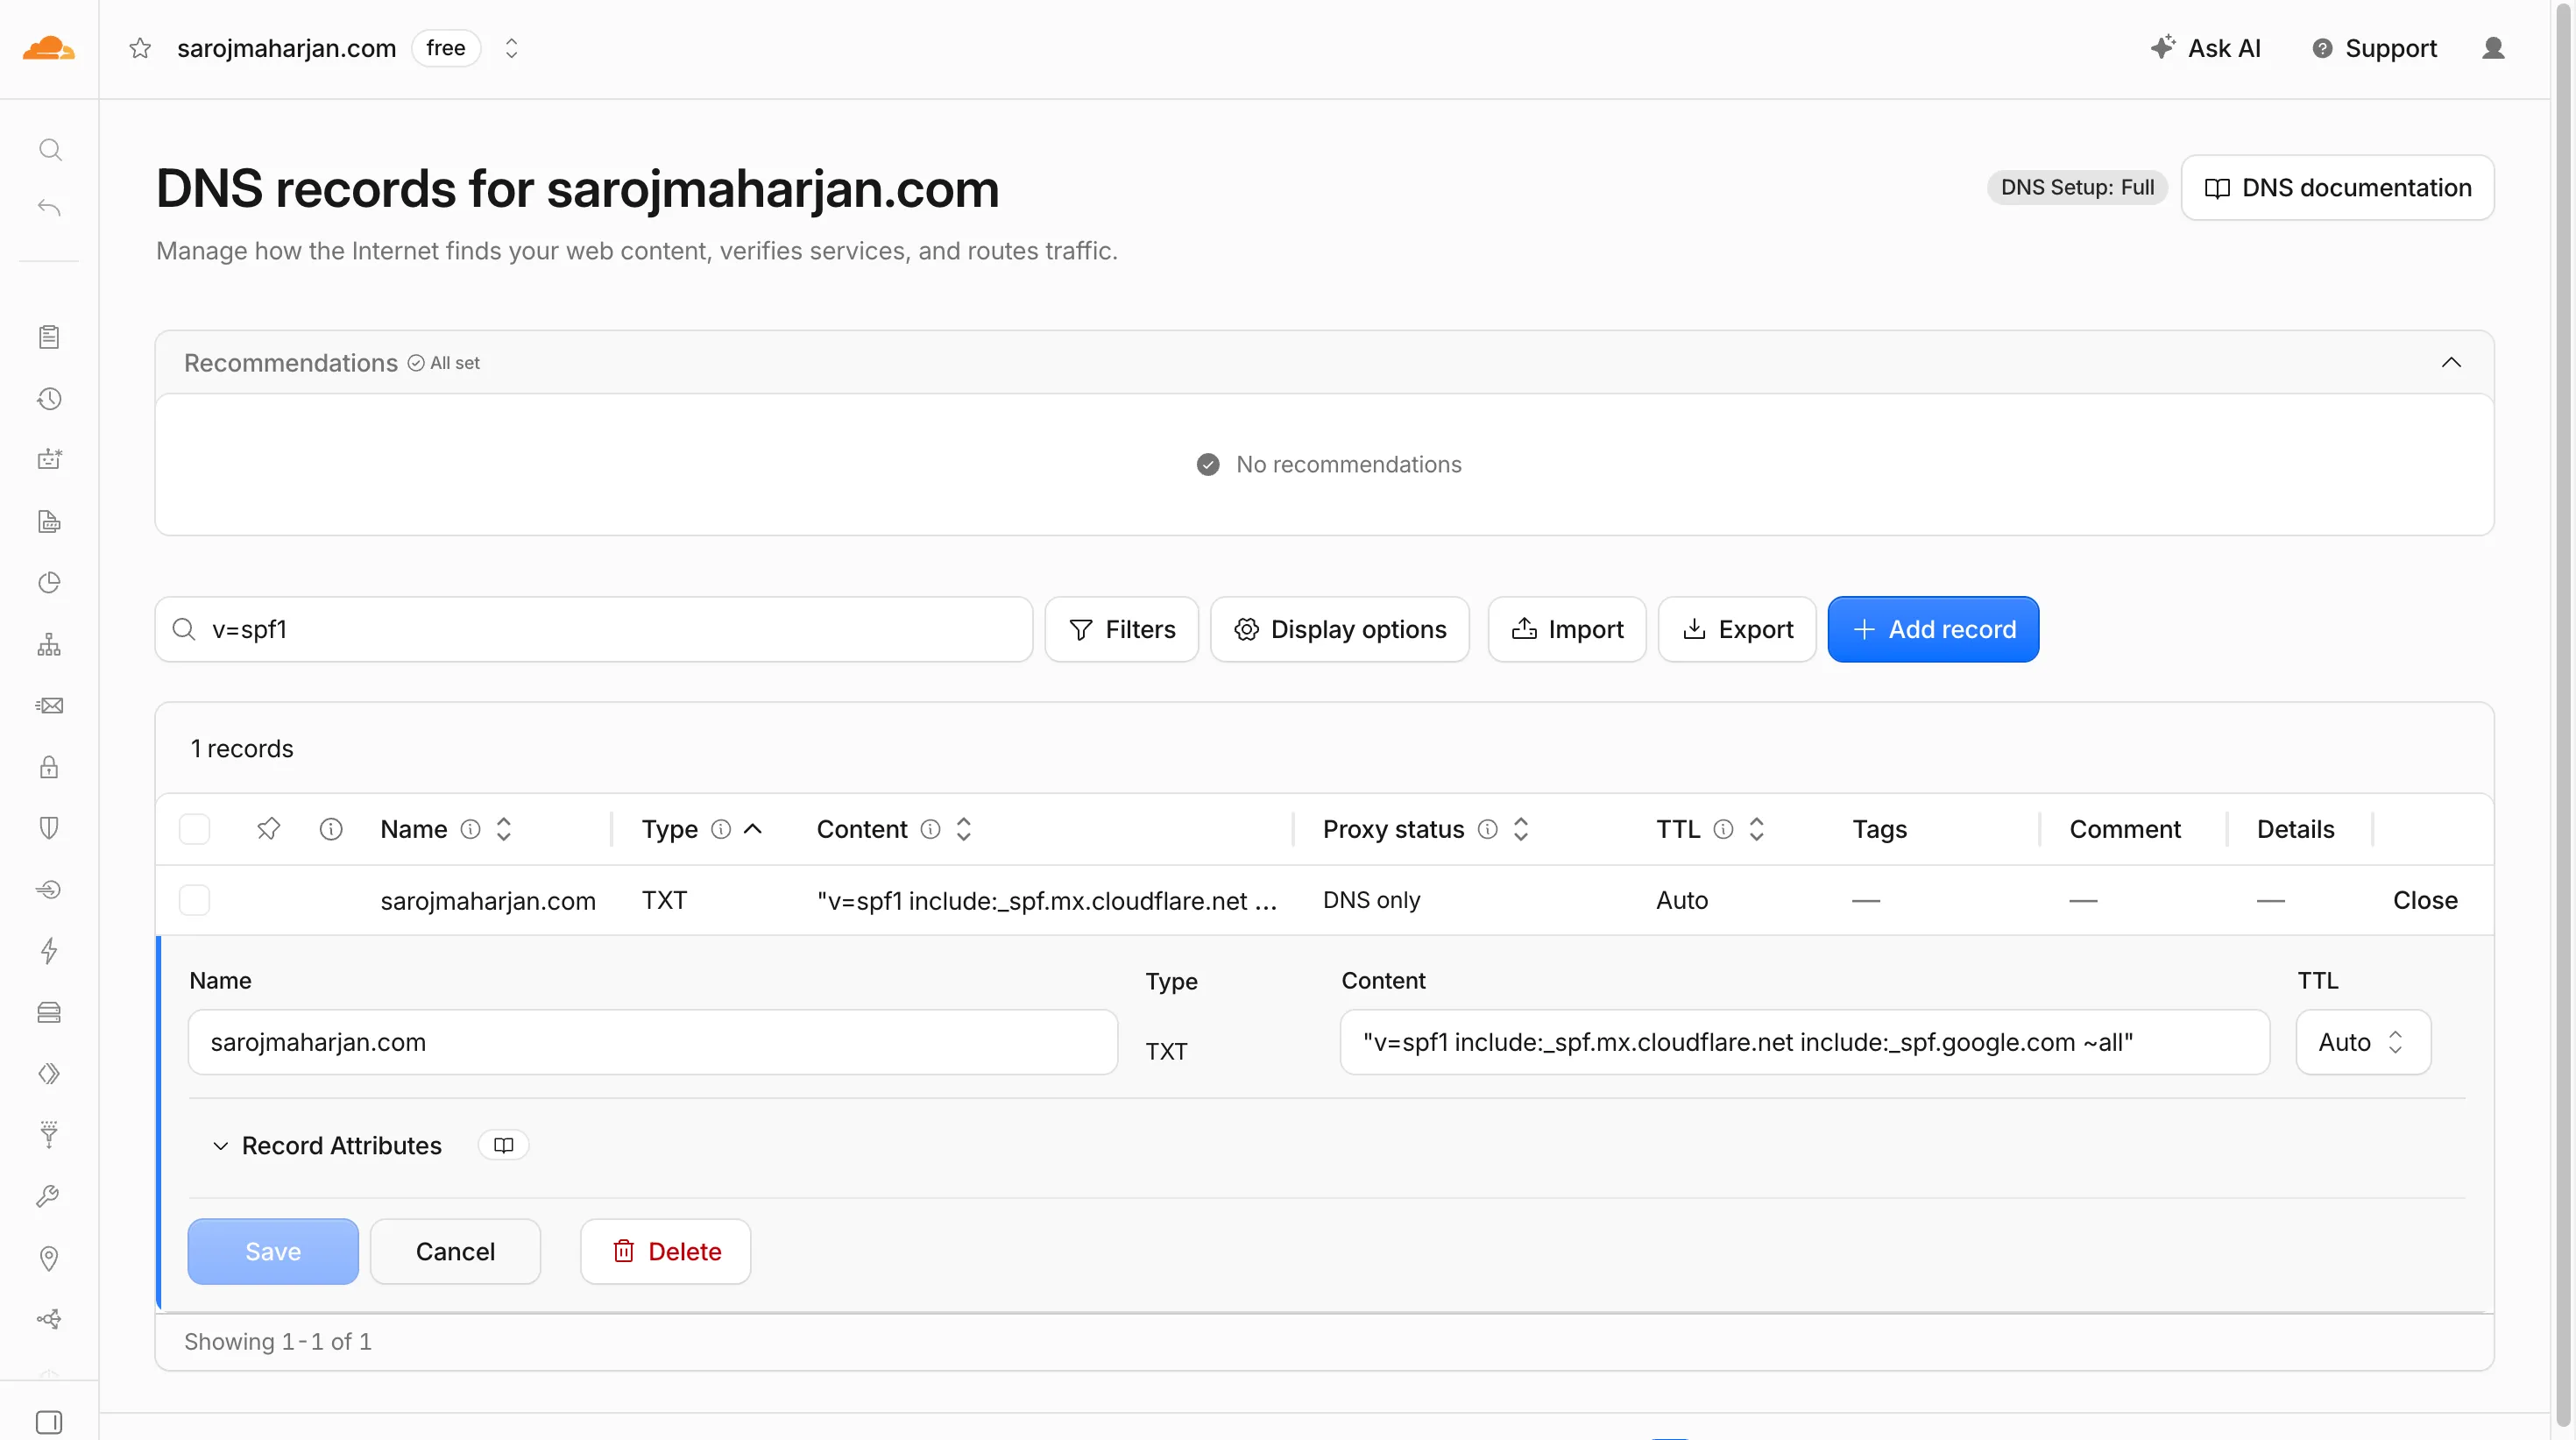
Edit the SPF TXT record to authorize both Cloudflare and Google to send email for your domain.
Bonus I: Catch-all rule
By default, Cloudflare only forwards email for addresses you explicitly created (e.g., hello@). If someone sends to billing@ or mistypes helo@, the message bounces.
A catch-all rule forwards everything sent to your domain.
- Go to Email > Email Routing in Cloudflare.
- Click the Routing Rules tab.
- Scroll to the Catch-all address section.
- Click Edit, set status to Enabled, pick Forward to, and select your Gmail address.
- Click Save.
Pro tip: If you receive an email at [email protected] via the catch-all and want to reply as that address, just repeat Step 4 with a new alias in Gmail. Same App Password works.
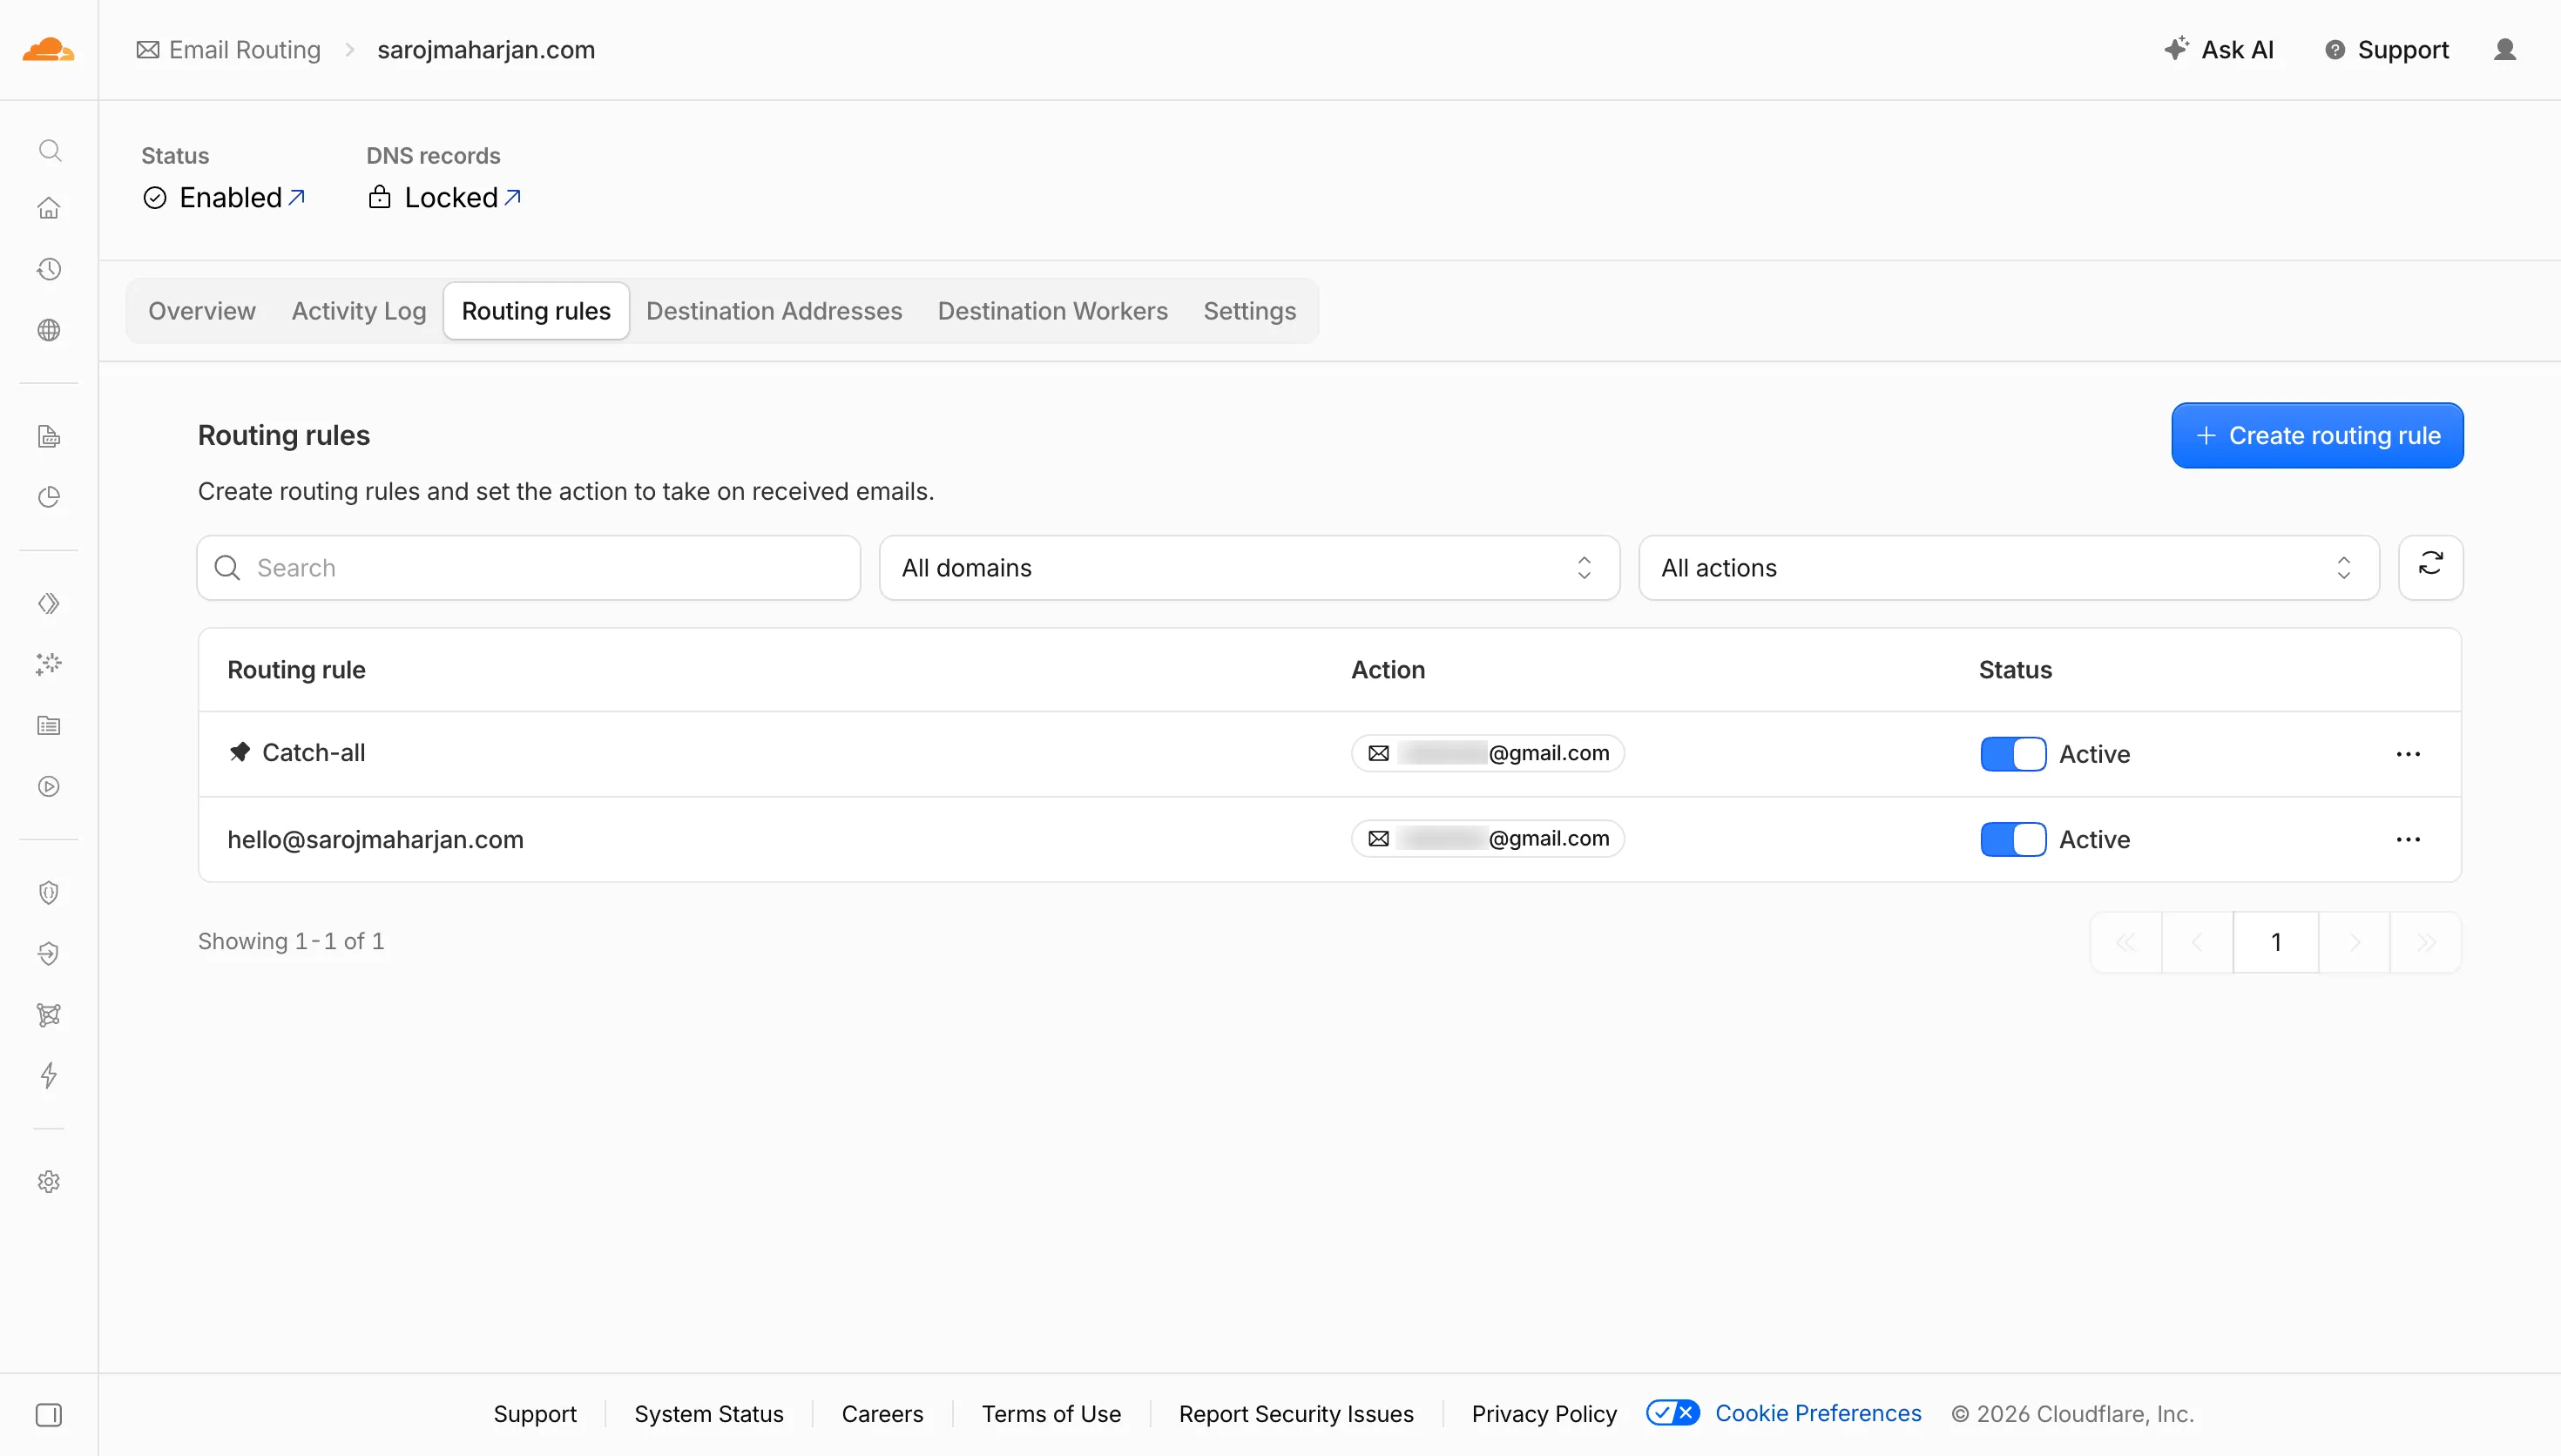
Enable the catch-all rule to forward every email address on your domain to your Gmail inbox.
Bonus II: DMARC policy
SPF alone isn’t enough for good deliverability. DMARC tells recipient servers what to do when authentication checks fail. Without it, some mail servers treat your domain as suspicious.
- Go to DNS > Records in Cloudflare.
- Click Add Record:
- Type:
TXT - Name:
_dmarc - TTL:
Auto - Content:
v=DMARC1; p=none; pct=100;
- Type:
- Click Save.
Why p=none? Normally you’d set p=quarantine or p=reject, but a free Gmail setup doesn’t have proper DKIM alignment on your custom domain. A strict DMARC policy would block your legitimate outbound emails. p=none tells servers “just report violations, don’t block anything” — safer for this setup.
Bonus III: Gravatar profile image
When you send an email from [email protected], most email clients (Gmail, Outlook, Apple Mail) look up Gravatar to show a profile photo next to your message. Without one, recipients just see a generic colored circle with your initials — or nothing at all.
- Go to gravatar.com and sign in with your personal Gmail address (the same one Cloudflare forwards to).
- Upload a profile photo and fill in your name.
- Gravatar will ask you to verify ownership. The verification email lands in your Gmail inbox (via Cloudflare routing). Click the link.
- Back on Gravatar, you can also add your custom domain email (
[email protected]) as an additional email address. Verify it the same way.
Now when you email someone from [email protected], their mail client will pick up the photo from Gravatar. It’s a small touch, but it makes your professional address look complete.
Testing your setup
Inbound test
Send an email to [email protected] from a completely different email account (Outlook, iCloud, whatever). If it shows up in your Gmail inbox within a few minutes, inbound is working.
Outbound test
In Gmail, click Compose, then change the From field to your custom domain. Send a test email to another address you control. If it arrives, outbound is working.
Deliverability check
- Go to Mail-tester.com (free).
- Copy the temporary test address they give you.
- Send an email from your custom domain to that address.
- Check your score. You’re looking for a high score and a green check on SPF alignment.
Caveats and limitations
This setup works, but it’s not the same as Google Workspace. Here’s what you should know:
- DKIM is misaligned. Personal Gmail signs outgoing mail with its own DKIM key (
gmail.com), not your domain. This is the main reason to keep DMARC atp=none. - “via gmail.com” tag. Some email clients (older Outlook, some mobile apps) show “Sent via gmail.com” next to your custom domain. Most people won’t notice. If you’re emailing clients who scrutinize headers, they might.
- Not for bulk sending. This is for personal correspondence. If you’re sending newsletters or transactional emails, use a dedicated service like Brevo or SMTP2GO .
Conclusion
For $0/month and about 15 minutes of setup, you get a professional-looking email address on your own domain. Inbound goes through Cloudflare, outbound goes through Gmail’s own servers. It’s not Google Workspace, but it doesn’t need to be — not for a portfolio, a side project, or a small business site that mainly receives inquiries and sends occasional replies.
When your project grows and you need real DKIM, shared mailboxes, or catch-all outbound profiles, you can migrate to Google Workspace without changing your email address. Until then, this costs nothing and works fine.
Got stuck on the App Password step or the SPF edit? Drop a comment below.